


If you've ever had to deal with a physical SIM card, then you're all too familiar with its limits. From having to wait in line at airports, to setup hassle and easy misplacement, the physical SIM card can cause frustration. That's where eSIMs come in.
eSIMs are digital SIMs that you can download directly to your phone. eSIMs help you stay connected on the go more smoothly, but like any new technology, you may need some guidance to get started. In this article, we'll take you through 3 simple steps to install and connect your Airalo eSIM.
In this article:
What Are the Benefits of Using an Airalo eSIM?

eSIMs have many benefits over traditional SIM cards, such as instant travel connectivity and more. Using an eSIM from Airalo comes with many benefits, including:
- No roaming fees. Airalo eSIMs are prepaid. Pay only for the data you need, and say goodbye to surprise roaming fees.
- You aren't tied to a specific carrier. You can choose the eSIM data package that best suits your needs and easily switch packages when you travel.
- You can connect like a local. Airalo works with local providers to ensure you get the best prices and service during your trip.
- Contact us 24/7. Our support team is available 24/7, so you can get the assistance you need, no matter your time zone.
Prepare for Your Airalo eSIM Setup

Before you install and activate your eSIM, check that your device is:
- Carrier-unlocked
- eSIM Compatible
- Connected to Wi-Fi
Read on for more information or jump to Step 1.
1) Ensure Your Phone is Unlocked
Carrier-unlocked means that your device isn't tied to a contract with a mobile carrier. If you're unsure, we recommend calling your carrier to confirm or checking your device's settings.
Here's how to do it on iPhone:
- Go to your iPhone's Settings.
- Tap General.
- Tap About.
- Scroll down to Carrier Lock or Network Provider Lock.
- Check the status there.
- If your iPhone is unlocked, its status will be No SIM restrictions. If it's locked, you'll see your carrier's name.
Settings will look different based on your Android model, but generally will look like this:
- Open Settings.
- Tap Network & Internet, Connections, or a similar menu option.
- Tap SIMs, Mobile Network, or a similar option.
- You'll then be able to choose a network/SIM or select network operators for further choices. If you see more than one network to choose from or options to manage your SIMs, this likely indicates that your phone is unlocked.
2) Check if Your Phone is eSIM-Compatible
Whether your phone is eSIM-compatible depends on the model and where it was manufactured, not just the year it was released. While many newer smartphones support eSIM technology, this isn't guaranteed.
Some phones only support eSIM technology in certain regions, while others may have different hardware depending on the market they were made for. For example, two phones with the same name can have different eSIM capabilities, depending on the country in which they were manufactured.
Before purchasing an eSIM, we strongly recommend verifying that your phone is eSIM-compatible, which means it supports the storage of digital SIMs. Here are a few ways you can do this:
Method 1: Settings Check
- Open Settings on your phone.
- Navigate to your SIMs (under Mobile/Cellular Networks or similar).
- Look for an Add eSIM or Download SIM option. You might have to select a SIM before you see the option.
- If it's there, you're eSIM-ready.
Note: Instructions vary based on your phone model. If you struggle to find the Add eSIM/or Download eSIM option, use your phone's search function.
Method 2: IMEI and EID Check
- Dial *#06# on your phone.
- If you see two IMEI numbers, your phone likely supports dual-SIMs (physical and eSIM).
- Note down the IMEI and check with your carrier.
- Alternatively, if an EID appears, your phone supports eSIM.
Method 3: Manual Check
- Check your phone's original packaging or documentation. If it's available, eSIM support is usually listed in the technical specifications.
- You can also check Airalo's regularly updated eSIM compatibility list here.
Method 4: Quick Dial Code (Android only)
- Open your phone app.
- Dial ##4636##.
- On most Android phones, this opens a hidden menu that allows users to view and modify network settings.
- From this menu, select Phone Information.
- Look for an eSIM or embedded SIM status.
Note: You can still purchase an eSIM if your phone isn't eSIM compatible. You'll have the option to share the eSIM to another device, rather than install it on your phone.
3) Connect to Wi-Fi Before Installing Your eSIM
We always recommend that you connect to a stable Wi-Fi network when installing your eSIM. This is because eSIMs can only be installed once, and an unstable connection can cause the installation to fail.
We generally recommend doing so before leaving for your trip, so that you can get connected upon landing. Most eSIM's validity period only starts when the eSIM connects to the mobile network in its coverage area, so that you won't lose precious data.
Pro tip: Check an eSIM's validity policy by selecting Package details before or after purchase. This will let you know if the eSIM's validity period starts when it connects to a network, or more rarely, upon installation.
Now that you've got the basics down, it's time to buy and install your eSIM.
Step 1: Buy an eSIM
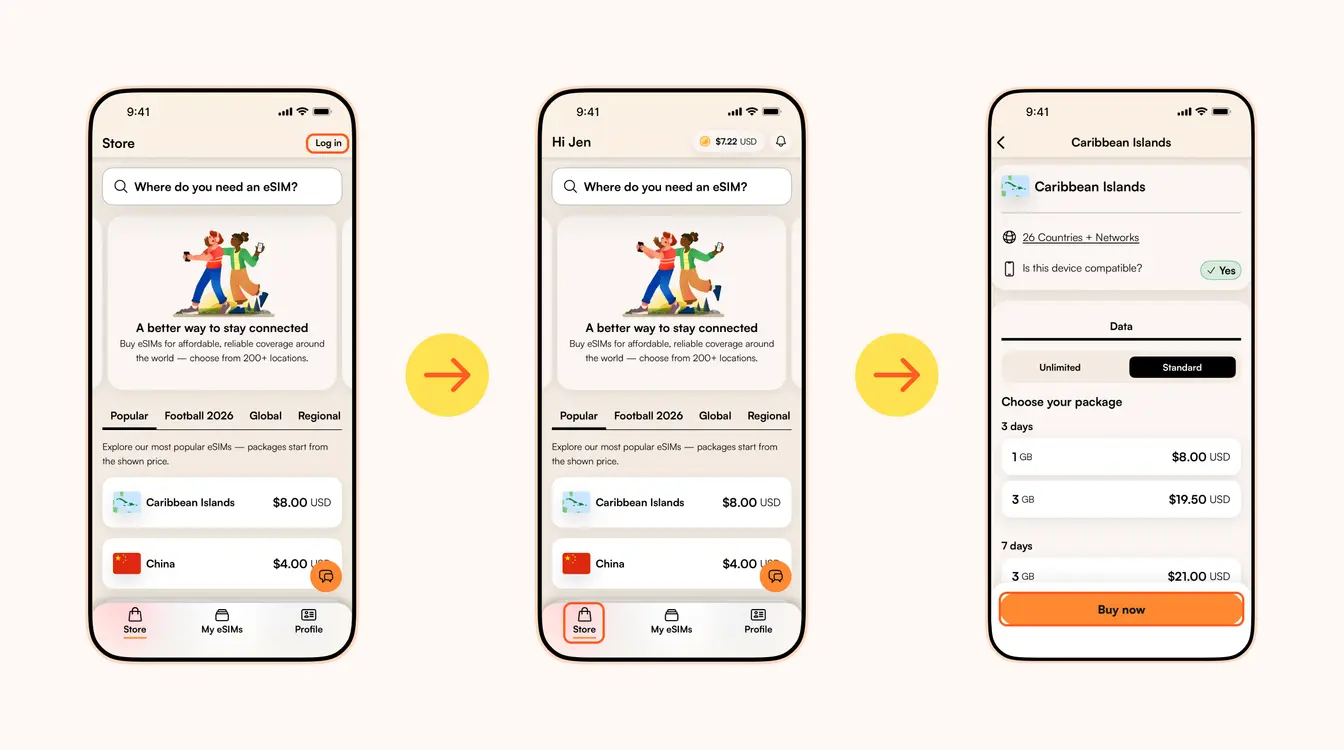
אם אי פעם נאלצתם להתעסק עם כרטיס SIM פיזי (שאנו בטוחים שיש לכם), אז אתם יודעים כמה נהדר זה יהיה לעבור לכרטיס eSIM. החל בקישוריות מיידית בזמן טיולים וכלה בשלבי התקנה והפעלה פשוטים, מה יש פה לא לאהוב?
ספקי eSIM כמו Airalo (כן, זה אנחנו!) עוזרים לכם להישאר מחוברים בכל מקום שתרצו. אנו מעניקים פתרון המאפשר לכם להימנע מהתעסקות בכרטיסי SIM ומספקים לכם קישוריות מיידית בלמעלה מ-200 מדינות ואזורים ברחבי העולם.
כמו עם כל טכנולוגיה חדשה, ייתכן שתזדקקו לקצת עזרה בהתחלה. במאמר זה, נדריך אתכם בשלבי ההתקנה וההפעלה של כרטיס ה-eSIM של Airalo.
מעבר אל:
- כיצד להתקין ולהפעיל כרטיס eSIM של Airalo בארבע שלבים
- התקנת כרטיס eSIM
- הפעלת כרטיס eSIM
- כרטיסי eSIM מקומיים, אזוריים וגלובליים
- יתרונות השימוש בכרטיס eSIM של Airalo
- שאלות נפוצות על כרטיסי ה-eSIM של Airalo
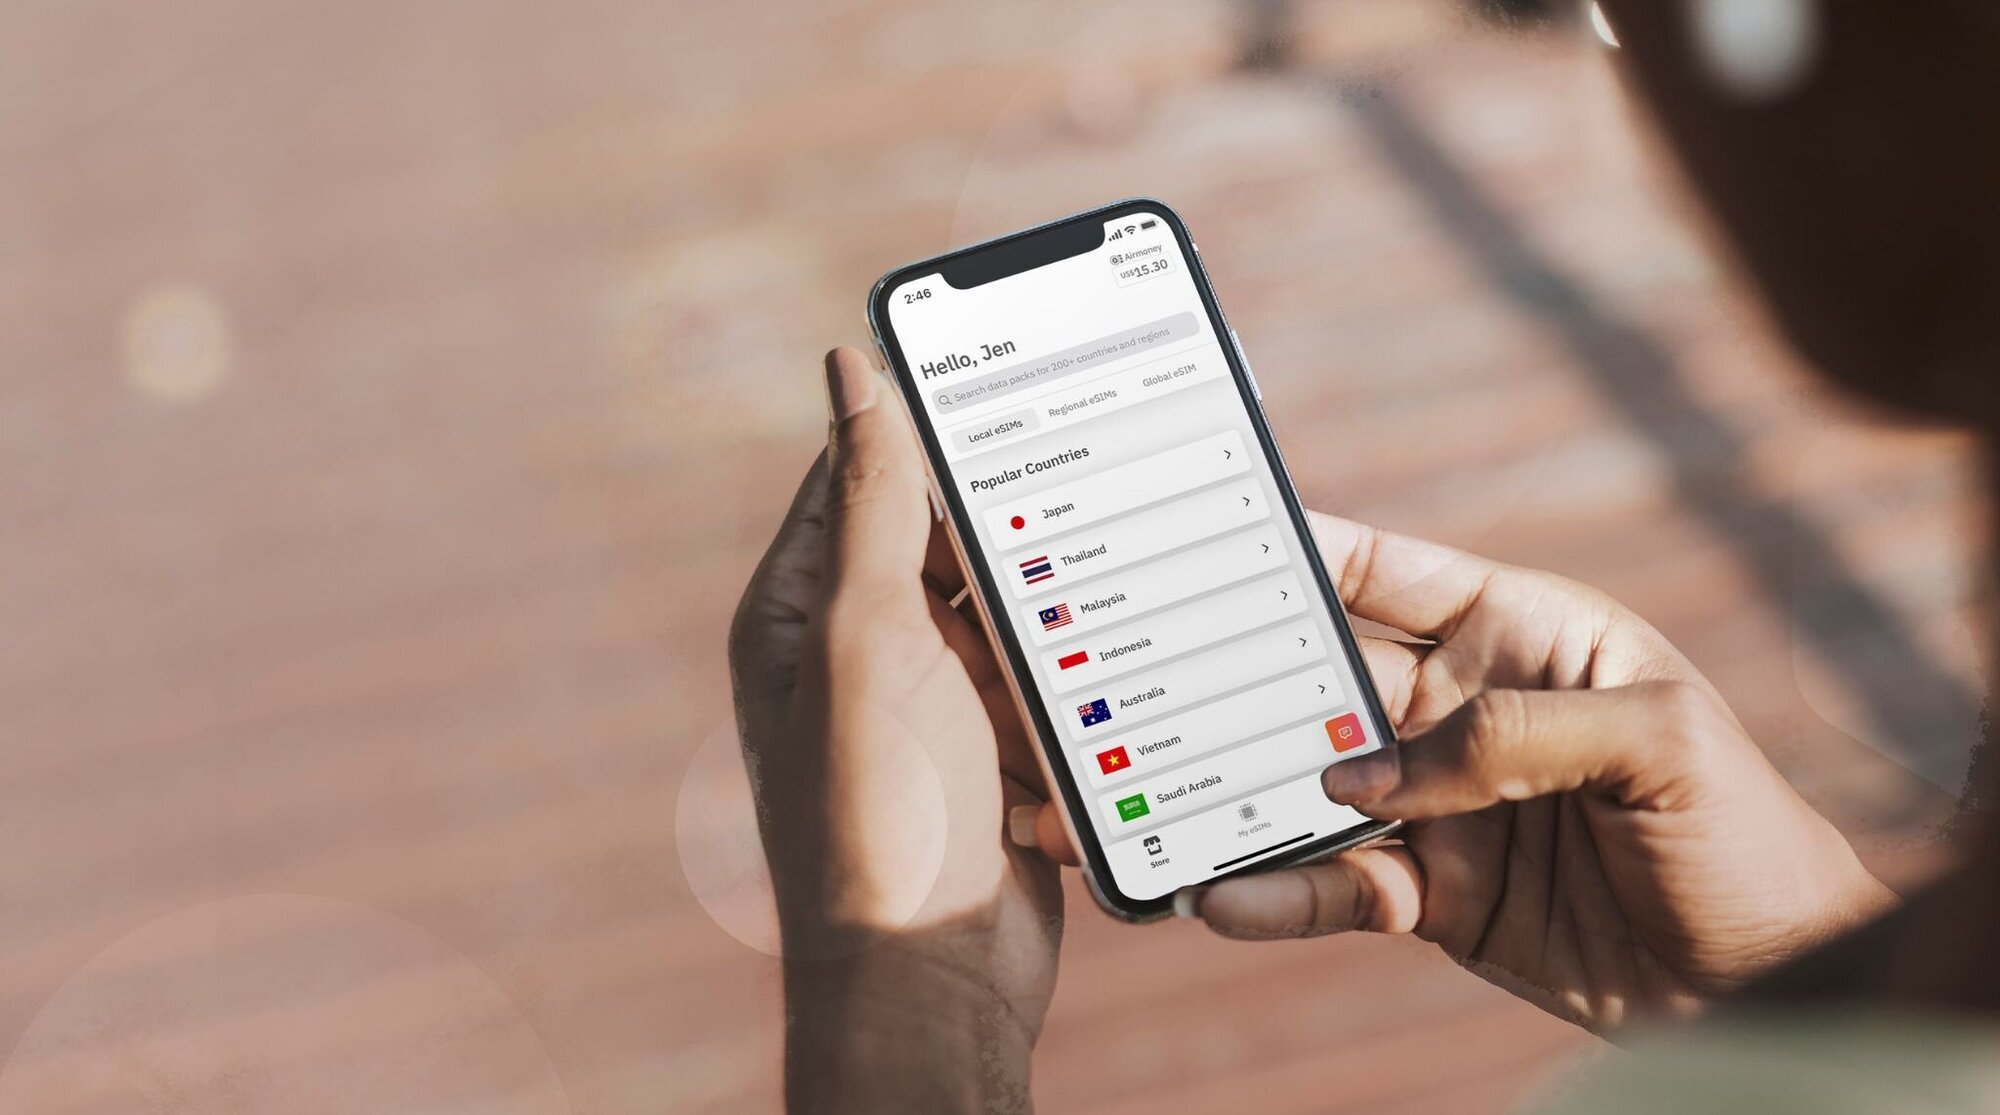
כיצד להפעיל כרטיס eSIM של Airalo בארבע שלבים
לפני התקנת והפעלת כרטיס ה-eSIM שלכם, ודאו שמכשירכם:
- אינו נעול על ידי המפעיל. כלומר מכשירכם אינו קשור בחוזה עם מפעיל סלולרי. אם קניתם את מכשירכם באופן ישיר, ללא הסכמי שירות סלולריים, קרוב לוודאי שמכשירכם אינו נעול. אם אינכם בטוחים, אנו ממליצים לכם להתקשר למפעיל שלכם כדי לברר זאת!
- תומך בכרטיסי eSIM. אם יש לכם טלפון חכם שיוצר בשנת 2018 או מאוחר יותר, קרוב לוודאי שהטלפון שלכם תומך בכרטיסי eSIM. עיינו ברשימה המקיפה שלנו של מכשירים התומכים בכרטיסיeSIM כדי לראות אם הטלפון שלכם כלול בה.
לאחר שווידאתם שמכשירכם אינו נעול על ידי המפעיל ותומך בכרטיסי eSIM, הגיע הזמן לבצע את ארבעת השלבים הפשוטים האלה כדי להתקין ולהפעיל את כרטיס ה-eSIM שלכם!
שלב 1: קונים כרטיס eSIM
ראשית תצטרכו לרכוש כרטיס eSIM. כך עושים זאת:
- עוברים לאתר של Airalo או מורידים את אפליקציית Airalo (הזמינה עבור מכשירי iOS וAndroid).
- בוחרים כרטיס eSIM עבור היעד שאליו אתם נוסעים.
- חשוב לקחת בחשבון גורמים כמו כמות הנתונים הנדרשת לכם, תקופת התוקף של כרטיס ה-eSIM ומחירו.
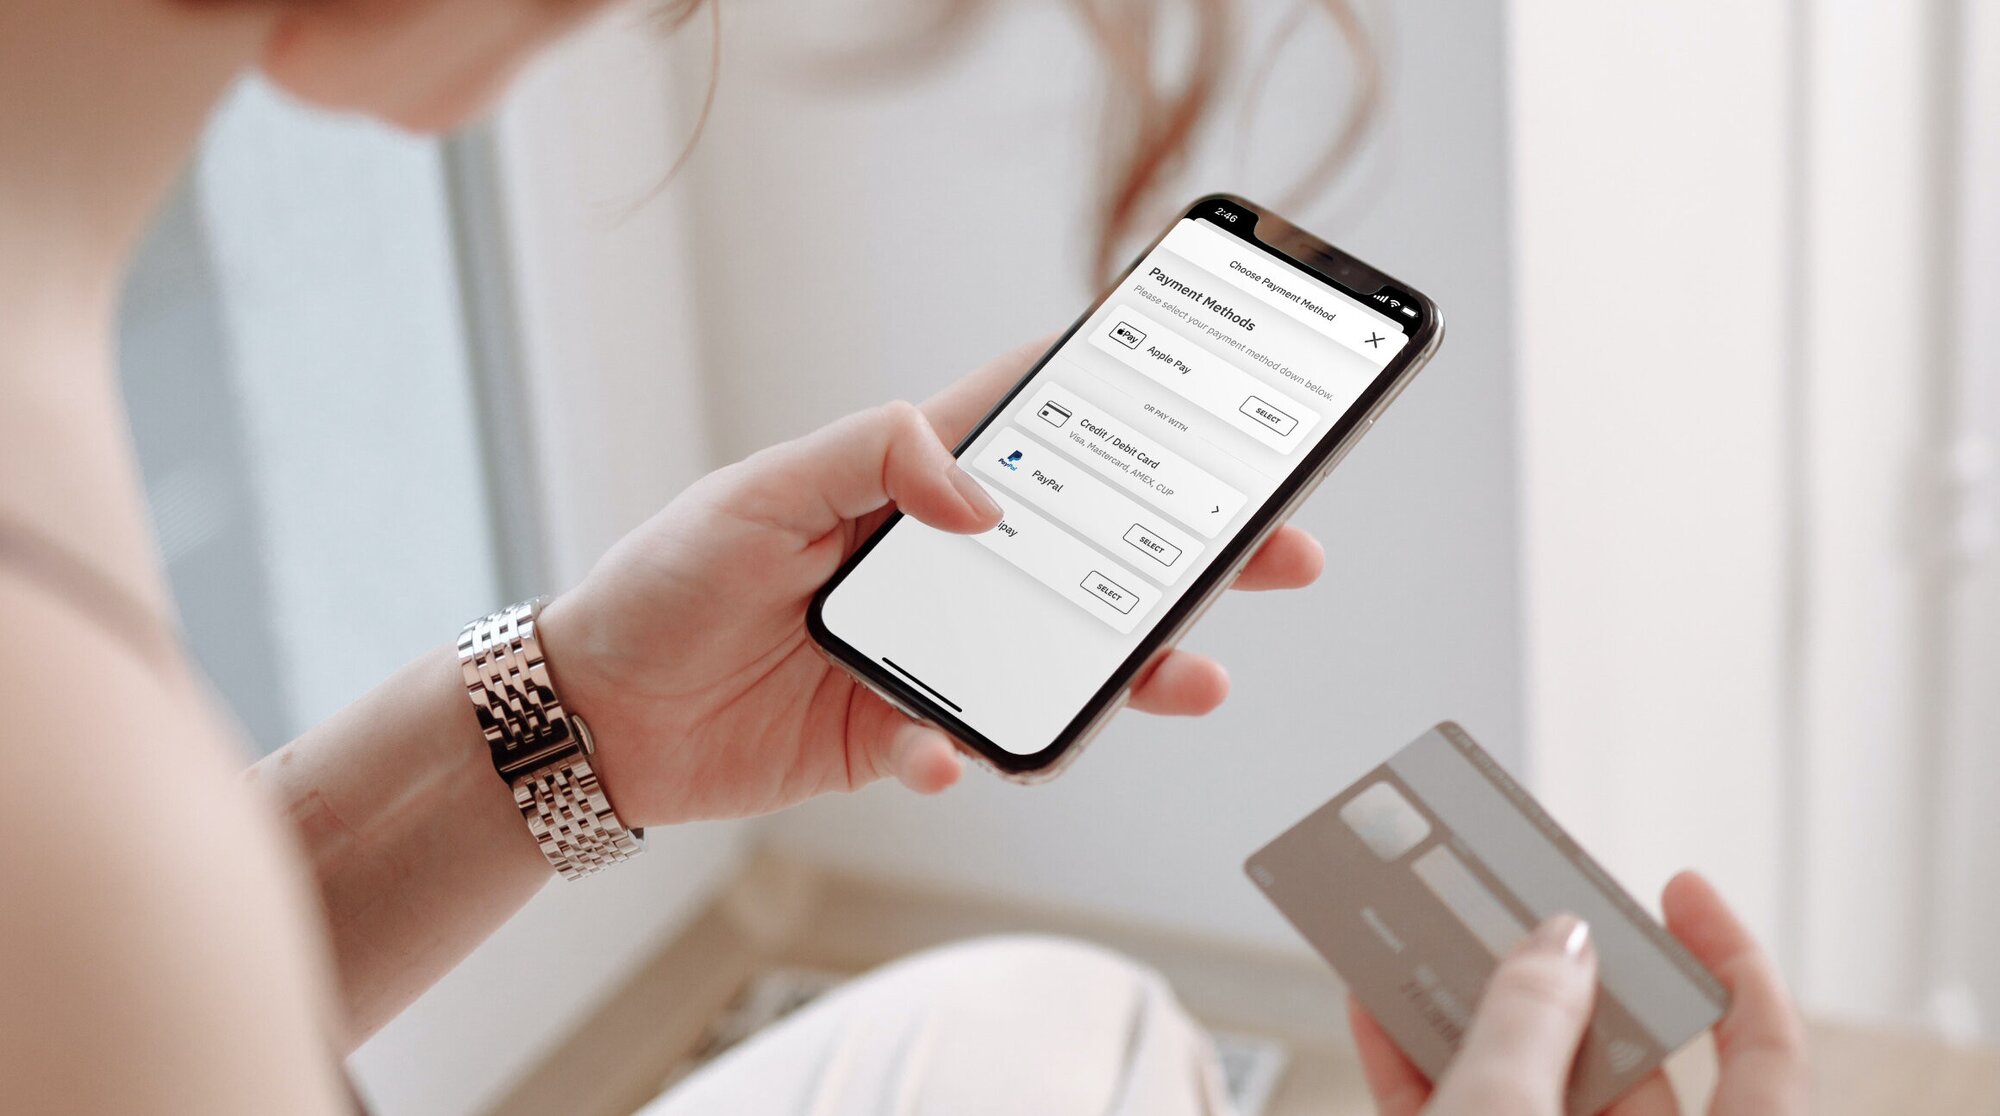
שלב 2: מתקינים את כרטיס ה-eSIM
לאחר רכישת כרטיס eSIM, תצטרכו להתקין אותו במכשירכם. לפני התחלת תהליך ההתקנה, ודאו שיש לכם חיבור לרשת Wi-Fi יציבה.
להלן שלוש שיטות שונות להתקנת כרטיס eSIM של Airalo:
- ישירה: עברו לאפליקציית Airalo ופעלו על פי ההנחיות המפורטות כדי להתקין את כרטיס ה-eSIM שלכם.
- קוד QR: סרקו קוד QR כדי להתחיל בתהליך ההתקנה.
- ידנית: הזינו ידנית את הפרטים של כרטיס ה-eSIM בסעיף ההגדרות של מכשירכם.
לקבלת פרטים נוספים על אופן התקנת כרטיס ה-eSIM שלכם, פעלו על פי השלבים המתוארים בקישורים הבאים:
- מדריך eSIM ל-iOS/iPhone
- מדריך eSIM ל-Android
- מדריך eSIM ל-Samsung Galaxy S20/S21
- מדריך eSIM ל-Google Pixel
- מדריך eSIM ל-Huawei
בעת ביצוע שלבי ההתקנה, תתבקשו להוסיף תווית לכרטיס ה-eSIM שלכם. לדוגמה, אם אתם מבקרים במצרים, תוכלו להוסיף לקו שלכם את התווית ״eSIM מצרים״ כדי להבדיל בין כרטיס ה-SIM הראשי לכרטיס ה-eSIM שלכם. זה עושה את החיים הרבה יותר קלים, במיוחד אם אתם משתמשים בכרטיס ה-SIM עבור שיחות והודעות SMS ובכרטיס ה-eSIM עבור נתונים.
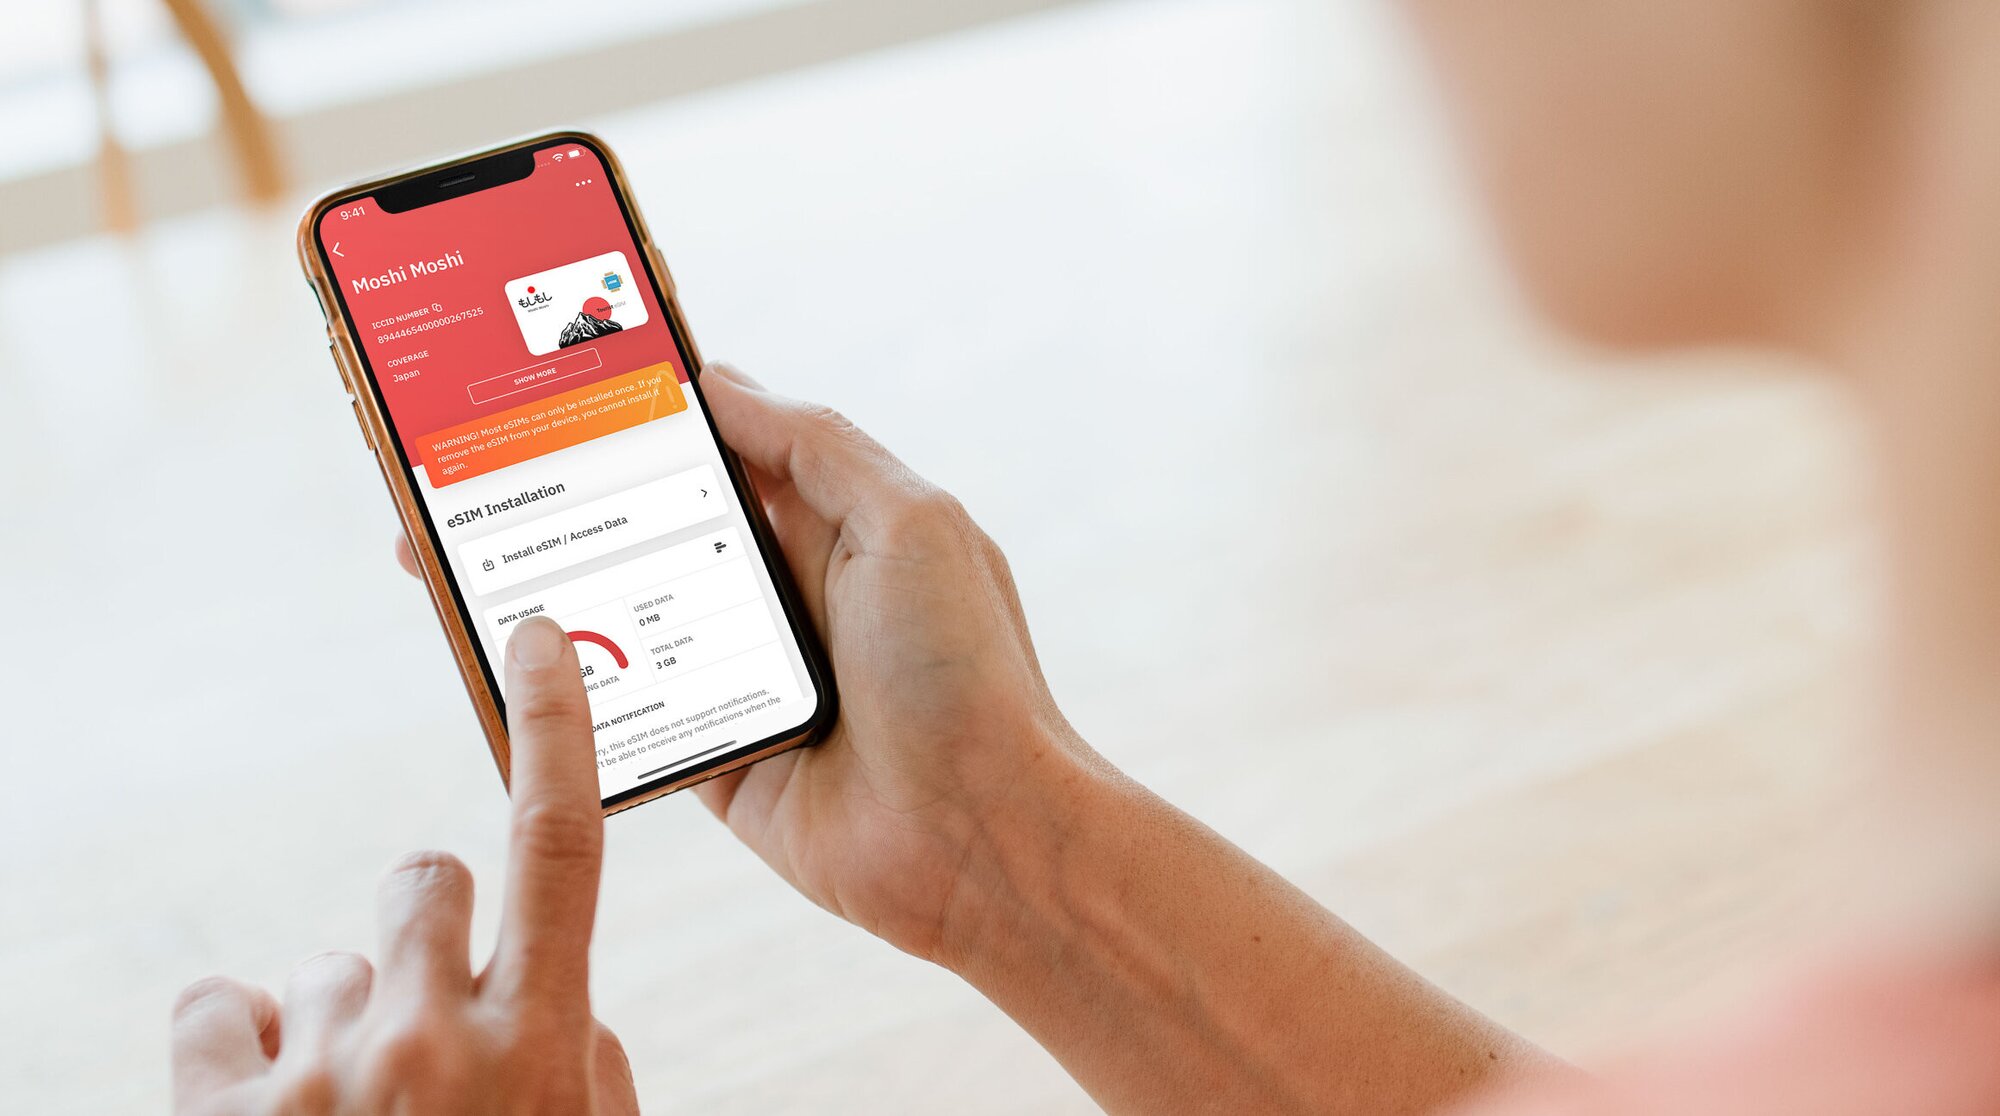
שלב 3: מפעילים את כרטיס ה-eSIM
במדיניות ההפעלה של כרטיס ה-eSIM שלכם מצוין מועד התחלת תקופת התוקף שלו. קיימים שני סוגים של מדיניות הפעלת eSIM:
- כרטיסי eSIM המופעלים לאחר התחברות לרשת נתמכת. רוב כרטיסי ה-eSIM יופעלו לאחר שתפעילו את קו ה-eSIM ותתחברו לרשת נתמכת במקום היעד שלכם. תקופת התוקף שלכם תתחיל לאחר שתתחברו ותוכלו להתחיל להשתמש בנתוני ה-eSIM שלכם.
- כרטיסי eSIM המופעלים לאחר התקנתם. חלק מכרטיסי ה-eSIM יופעלו מיד לאחר ההתקנה (גם אם לא יצאתם מהבית). עבור כרטיסי eSIM המופעלים באופן מיידי, אנו ממליצים להתקין אותם ממש לפני הטיול כדי שתוכלו להפיק את המרב מנתוני ה-eSIM שלכם.
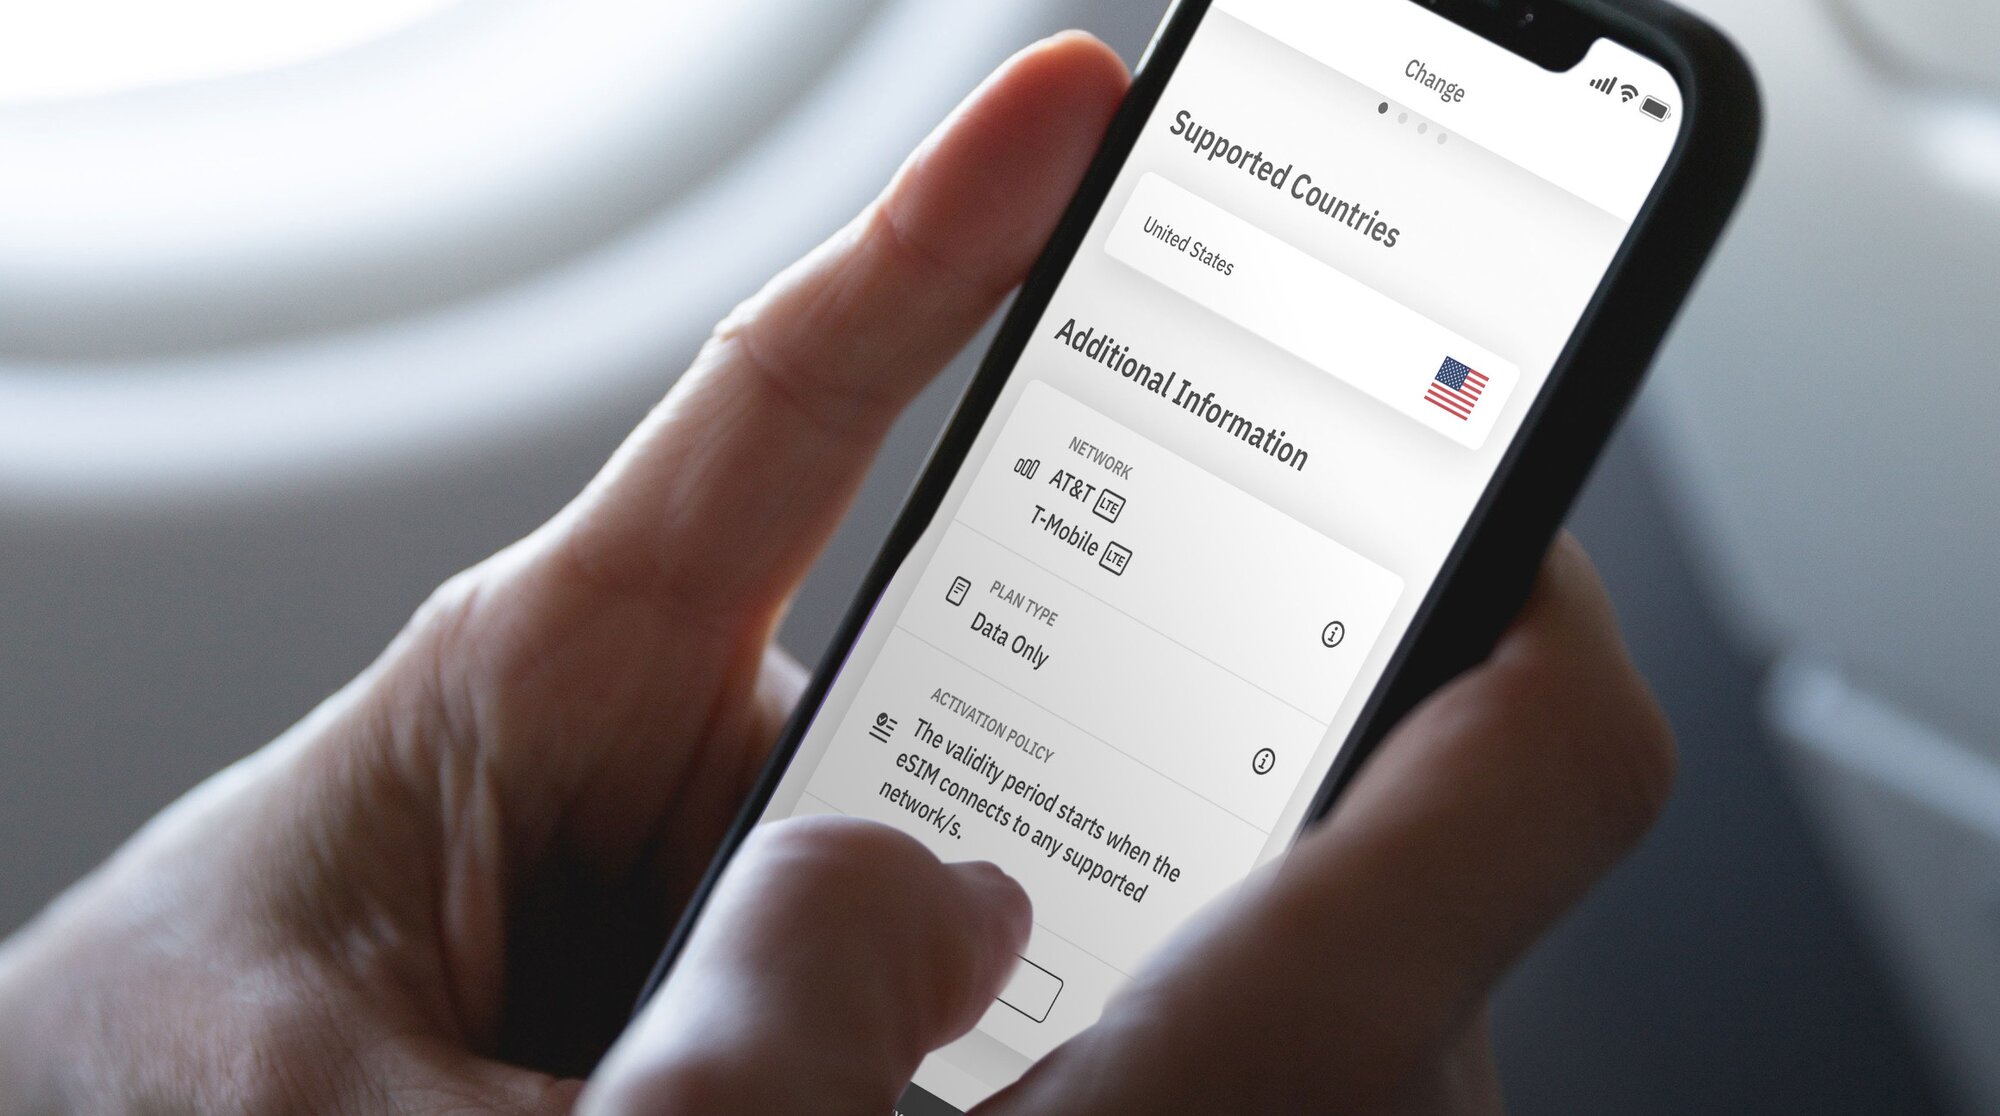
תוכלו למצוא את מדיניות ההפעלה בסעיף מידע נוסף של כרטיס ה-eSIM שלכם:
- פותחים את אפליקציית Airalo.
- בוחרים בכרטיס ה-eSIM שרוצים לרכוש.
- מקישים על לקנות עכשיו לצפייה בפרטים שלו (אל דאגה, לא תצטרכו לרכוש את כרטיס ה-eSIM בשלב זה).
- גוללים למטה אל מידע נוסף.
- קוראים את מדיניות ההפעלה.
שלב 4: מתחברים לרשת מקומית
כעת כשאתם יודעים על שני סוגי המדיניות של הפעלת כרטיסי eSIM, בואו נסקור את השלבים שיש לבצע כדי להפעיל את קו ה-eSIM שלכם ולהתחבר לרשת מקומית.
כך משביתים את קו ה-eSIM ב-iPhone:
- עוברים אל הגדרות.
- מקישים על סלולרי.
- מקישים על קו ה-eSIM שלכם.
- מפעילים את המתג הפעל קו זה.
- מפעילים את המתג נתונים בנדידה.
- מקישים על בחירת רשת ובוחרים רשת נתמכת (תוכלו למצוא רשימת רשתות בסעיף מידע נוסף בכרטיס ה-eSIM).
וכך עושים זאת ב-Android:
- עוברים אל הגדרות.
- מקישים על רשת ואינטרנט.
- מקישים על רשת סלולרית.
- מפעילים את ה-eSIM שלכם.
- מפעילים את האפשרות נתונים סלולריים.
- מפעילים את האפשרות נתונים בנדידה.
- בוחרים רשת נתמכת (תוכלו למצוא אותה בסעיף מידע נוסף בכרטיס ה-eSIM).
בחרו בין כרטיס eSIM מקומי, אזורי או גלובליים
כרטיס ה-eSIM של Airalo מאפשר לכם להתחבר בלמעלה מ-200 מדינות ואזורים ברחבי העולם.
יותר מכך, באפשרותכם לבחור חבילת eSIM בהתאם לצרכים שלכם. ניתן לבחור בין:
- כרטיס eSIM מקומי: אם אתם נוסעים ליעד אחד, הגיוני לבחור בכרטיס eSIM מקומי. חבילה מסוג זה מעניקה כיסוי במדינה אחת.
- כרטיס eSIM אזורי: התחברו מבעד לגבולות מבלי להחליף כרטיס eSIM. חבילה מסוג זה מעניקה כיסוי במספר מדינות באזור מסוים. היא תתאים לכם בצורה מושלת אם אתם מטיילים בין איים, יוצאים לטיול באירופה או מחפשים הרפתקה באפריקה!
- כרטיס eSIM גלובלי: אם אתם רוצים לטייל בעולם, כרטיס eSIM גלובלי הוא הפתרון המושלם לשמירה על קישוריות. חבילת eSIM גלובלית מעניקה כיסוי במספר יעדים ברחבי העולם.
יתרונות השימוש בכרטיס eSIM של Airalo
לכרטיסי eSIM יש יתרונות רבים על פני כרטיסי SIM מסורתיים, כגון קישוריות מיידית בעת נסיעות ועוד. לשימוש בכרטיס eSIM מבית Airalo יש יתרונות רבים, לרבות:
- אין עלויות נדידה. חבילות ה-eSIM של Airalo הן בתשלום מראש. אתם תשלמו רק עבור הנתונים שתרכשו מראש או התוספות שתרכשו לאורך הדרך.
- אינכם קשורים למפעיל ספציפי. תוכלו לבחור את חבילת ה-eSIM המתאימה ביותר לצרכים שלכם ולהחליף חבילות בקלות תוך כדי שאתם מטיילים.
- תוכלו להתחבר כמו מקומיים. Airaloעובדת עם מפעילים מקומיים כדי להבטיח שתוכלו ליהנות מהמחירים ומהשירות הטובים ביותר במהלך הטיול שלכם.
- פנו אלינו 24/7. צוות התמיכה שלנו זמין 24/7, מה שאומר שתוכלו לקבל את הסיוע הנדרש לכם, ללא קשר לאזור הזמן שבו אתם נמצאים.

שאלות נפוצות הקשורות לכרטיסי ה-eSIM של Airalo
ייתכן שיהיו לכם כמה שאלות כשאתם שוקלים להשתמש בכרטיס eSIM של Airalo לצרכים שלכם בזמן טיולים.
כמה זמן נמשכת הפעלת כרטיס ה-eSIM שלי?
ההפעלה מתרחשת באופן מיידי!
בהתאם למדיניות ההפעלה של כרטיס ה-eSIM שלכם, הוא יופעל מיד לאחר התקנתו או כשתתחברו לרשת נתמכת במקום היעד שלכם.
בשני המקרים תצטרכו להפעיל את קו ה-eSIM ולהתחבר לרשת נתמכת כדי להשתמש בנתוני ה-eSIM שלכם.
האם עליי להפעיל מחדש את כרטיס ה-eSIM כשהחבילה שלי תסתיים?
לא! חבילת Airalo כבר כוללת נתונים שנוספו מראש, בהתאם לחבילה שאתם קונים. אם הנתונים שלכם אוזלים או שתקופת התוקף עומדת לפוג, תוכלו לרכוש תוספת בקלות באפליקציית Airalo.
אם לחבילת ה-eSIM שלכם אין אפשרות לרכישת תוספת, תוכלו להוריד חבילת eSIM נוספת כדי להישאר מחוברים.
מה אפשר לעשות עם כרטיס eSIM של Airalo?
עם כרטיס eSIM של Airalo ניתן לעשות את אותם הדברים כמו עם כרטיס SIM מסורתי, לרבות: להתחבר לרשת סלולרית, לגלוש באינטרנט, להשתמש באפליקציות המועדפות עליכם ולהשתמש באפליקציות לביצוע שיחות ולשליחת ולקבלת הודעות דרך האינטרנט (כמו למשל, WhatsApp).
האם אפשר להשתמש בכרטיס SIM ובכרטיס eSIM ביחד?
בוודאי! רוב המכשירים יאפשרו לכם להשתמש בכרטיסי SIM ו/או בכרטיסי eSIM מרובים בו זמנית. ניתן להשתמש בכרטיס ה-SIM של הרשת הביתית שלכם עבור שיחות והודעות SMS, ובכרטיס ה-eSIM עבור נתונים.
אם עדיין יש לכם שאלות בנוגע להפעלת כרטיס eSIM, עברו אל מרכז העזרה שלנו או שלחו לנו דוא״ל לכתובת [email protected].
מעוניינים להשתמש בכרטיס eSIM כדי להישאר מחוברים במהלך הטיול שלכם? עיינו בכרטיסי ה-eSIM של Airalo כדי להתחבר בלמעלה מ-200 מדינות ואזורים.
Step 2: Install Your eSIM
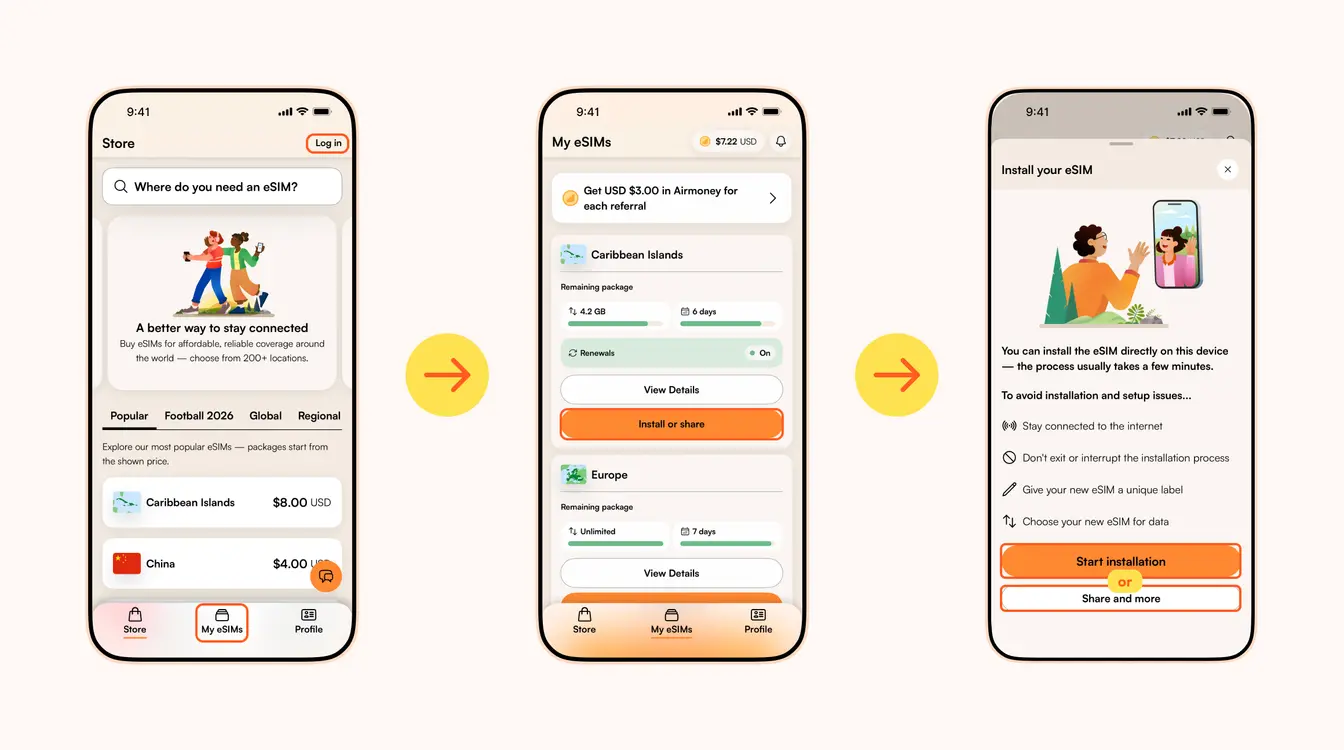
Once you've purchased your eSIM, you can choose to install or share the eSIM. If it's for your own use, select Start installation. Remember, you'll need a stable Wi-Fi connection for this.
Here are three different methods to install an Airalo eSIM:
- Direct: This is the most straightforward option. Go to your eSIM in the Airalo app, select Install or share → Start installation and follow the step-by-step prompts.
- QR Code: Use a QR code to start the installation process on another device. You can find more information under Install or share → Share and more.
- Manual: Enter your eSIM details manually in your device's Settings section. You can find more information under Install or share → Share and more.
For details on how to install your eSIM on a specific phone, follow the steps outlined in these links:
- iOS/iPhone eSIM guide
- Android eSIM guide
- Samsung Galaxy S20/S21 eSIM guide
- Google Pixel eSIM guide
- Huawei eSIM guide
Pro Tip: As you follow the installation steps, you'll be prompted to label your eSIM. For example, if you're visiting Japan, you can label your line as "Japan eSIM" to distinguish between your primary SIM and your eSIM. It makes switching between your eSIMs and turning them on and off easier — especially when using your SIM card for calls and texts, and your eSIM for data.
Step 3: Activate/Connect to Your Destination's Network
When should you activate/connect your eSIM?
Once you've installed your eSIM over Wi-Fi, the next step is to connect your eSIM. If you want to connect automatically on arrival, follow the steps below before you take off for your trip. Otherwise, you can do so once you arrive at your destination (you don't need a Wi-Fi connection for this step).
Follow the steps below to connect your eSIM to a network:
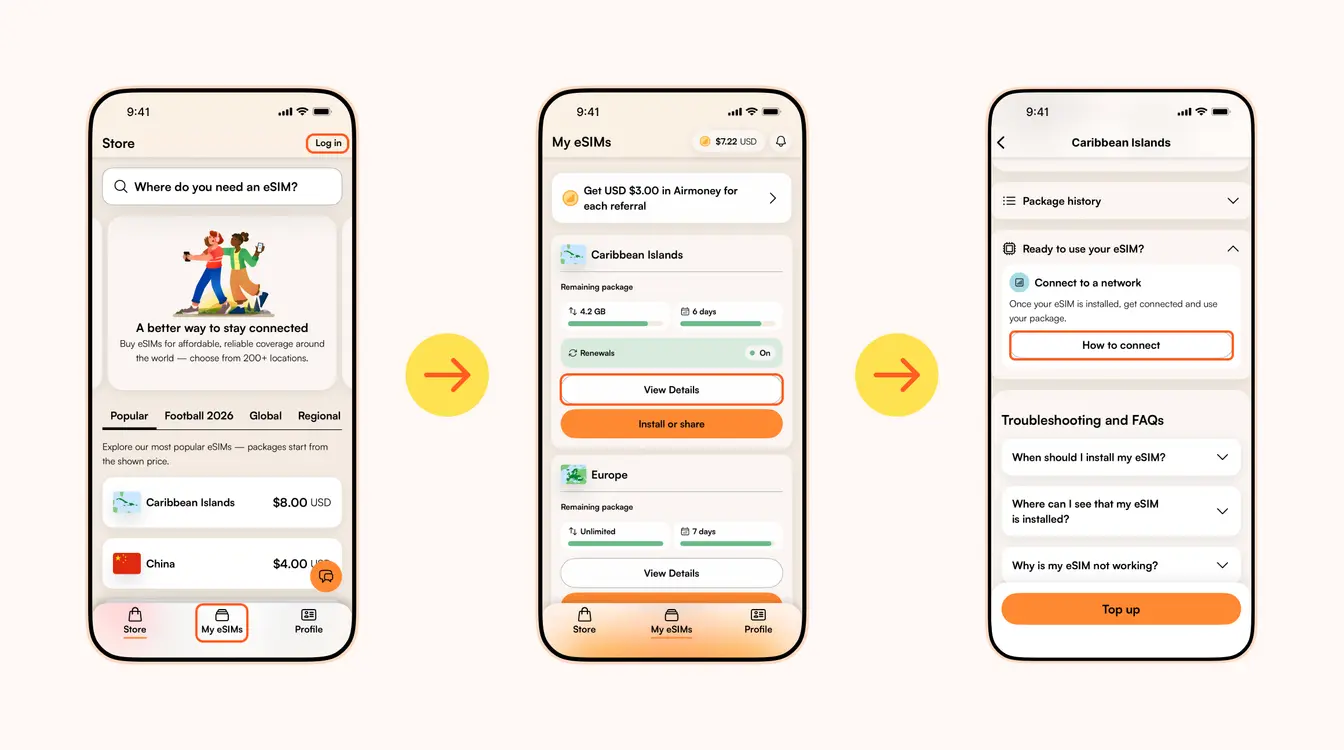
1. Go to the Airalo app
2. Navigate to My eSIMs → Your eSIM → View details → Ready to use your eSIM → Connect to a network → How to connect.
There, you'll find the exact steps you need to follow, but read on for a quick summary.
Here's how to turn on your eSIM line on iPhone:
- Go to Settings.
- Tap Cellular/Mobile Service.
- Select your new eSIM, if it hasn't already been selected.
- Toggle on Turn On This Line.
- Toggle on Data Roaming (if required in How to connect).
- Return to the main Cellular/Mobile Service menu.
- Tap Cellular Data/Mobile Data.
- Choose your eSIM.
- If your package includes calls and texts, tap Default Voice Line and choose your eSIM there as well.
Here's how to do it on Android:
- Go to Settings.
- Tap Network & Internet.
- Tap Mobile Network.
- Turn on your eSIM.
- Turn on Mobile Data.
- Turn on Data Roaming (if required in How to connect).
In case your eSIM does not connect to a network, try turning your phone off and on, or enable airplane mode for 10 seconds to refresh the network connection.
Important:
- To avoid being charged for roaming fees, you'll also want to turn off your carrier's data service. You can read how to do this here.
- If you're using a Global eSIM or a regional eSIM that includes your home country, do not activate it before you travel. Otherwise, it may activate in your home country, causing the validity period to begin before your trip.
- If your eSIM supports multiple networks, you can manually select the network you want to use. Check the supported networks for your eSIM in the Airalo app.
You can also follow our troubleshooting steps or contact our 24/7 help support.
מפנה למרכז העזרה של Airalo לקבלת מידע תמיכה נוסף.
פותח צ'אט עם התמיכה של Airalo ב-WhatsApp.
Looking to use an eSIM to stay connected during your trip? Browse Airalo eSIMs to connect in 200+ destinations.